Overall i am really happy with the way it has turned out. i think i have captured what it is to make a skateboard video but still met the requirements of the soundtrack. Applying the videos in the correct order wasnt that hard but adjusting the soundtrack to fit nicely was a little more tricky. I made it so it started on the first trick being landed and ended on the last trick being landed, and finished with a cheer as the final trick was completed. I really liked that part of my animation as it added depth and a surprise to the film. I am much more pleased with this resubmission than i was with my first one, i have spent more time and been more careful. Above all, i have learnt a great deal on how to use after effects and the basic components of animation so i am very pleased with my achievement. I shall now go and perfect any imperfections in my personal time so i know how to correct mistakes for the future.
Thursday 11 August 2011
Final Animation
This is my Final Animation. I had to convert it down so the file size wasnt too big for my blog. Here it is.
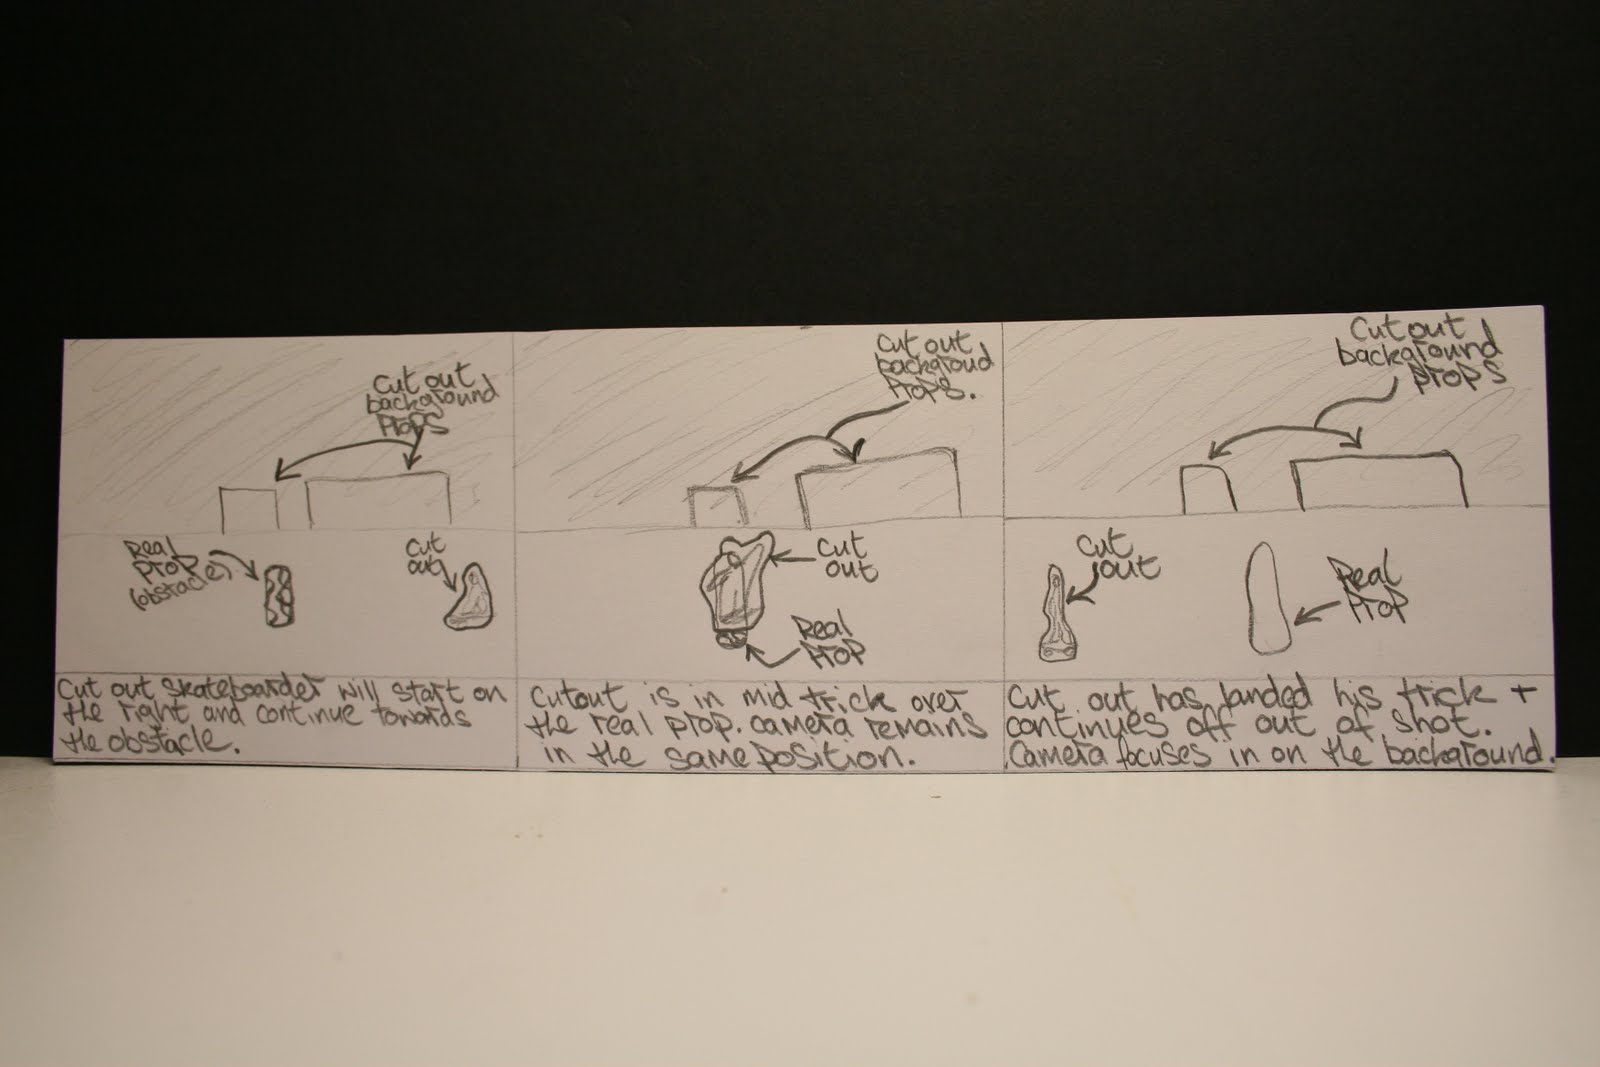
My Final Storyboard


This is my Final Storyboard. I have mixed and matched with my individual storyboards to create a sequence that i think will work the best.
After Effects Development

After importing all my images into my project panel, i then selected them all and dragged them onto the new composition icon. I then selected how long i would like to see each frame for and click okay. This then adds them all together and puts them in a sequence on your timeline ready to view.

This is how it looks when you've done this, all you need to do now is set the frame rate and you ready to play.
This is now a composition of its own so it will be much easier to work with as a pose to having a timeline full of pictures.

Next i created a new composition to the dimensions of PAL D1 Square Pixel. This brought me up a whole new composition but in the correct dimensions. Then i simply added the photo sequence composition onto the timeline of my new composition.

When shooting my animation i used a Digital SLR camera so the photos where huge, so after i added them to the timeline i selected my series of images and went to the transform menu, then scale and reduced the size of my work to 25% of the original size. This fitted perfectly in my correct area size.

Next i came out of After Effects and entered an audio cutting program called Power Audio Cutter. This is the software i used to cut down my skateboarding sound effects so that they would be easier and more manageable to use in After Effects.

Here i have inserted the sound clip that i cut down and adjusted it to fit nicely on top of my movie clip.

After deciding that the clip was finished i then added it to the render queue and selected the appropriate setting for exporting it as a quicktime movie. I then made sure i checked the audio box because if i didnt after effects would not render my audio. When all was done i set it to render and waited for my clip to be finished.
I did this to all my individual clips.

There we have it, my clip played perfectly, I used this process on every one of my individual skate clips and then i shall import all the videos into a new composition and add my assigned soundtrack.
My Stop Motion Clips
These were the first three clips that i made, I am really happy with them especially the two that i have used background cutouts for, they add so much character to the trick.
These were the second three animation clips i made, i have tried to create an atmosphere by continuing to use the background cutouts. Also i have tried to copy the camera angle from the original snapshot sequence to enable me to get the fluid motion of the athlete as near as possible to the real thing.
These are my last three clips. These are my favorites ones so far. I have picked up a lot of little techniques such as taking multiple pictures at the beginning and end to stop the clip from being so quick and cutting off so fast, and i have learnt how to chop up and apply sound effects. These techniques have helped me to create these animation accurately.
This is my final trick, in skateboard videos the last trick is always the best or the most technical or difficult. There is no exception with my animation. I have aimed for this trick to be the best and it is. By using a low camera angle i have been able to make the obstacle he is using look massive, just like they do in real skateboard films. I have used the correct camera angle and a very fitting sound effect. I even chose a sound effect that had some cheering on it which defiantly added a spot of liveliness and character.
Wednesday 10 August 2011
Storyboards
I decided to create an individual storyboard for each of my clips then i could rearrange them into an order i liked and stack them up to create my final storyboard.


My Setup
This is my scene that i would be using for all my stop motion clips. I have some black board for the background, this will make it easy for me to attach any background props to them. I may use some background cut outs to make the scene not look so bland and to add some character.


This light is very useful because it is fully maneuverable so wherever i need the light to be entering the shot iv got it.
My Cutout Figures
Here are my cutout figures. I shall use these in a stop motion animation on a mini skate spot that will be created by me. I have left a small amount of excess image on the snapshots that are in mid air, this will recreate the effect that the skateboarder is jumping off the ground just like he would in real life.


I am very pleased with the way these look, and I hope they look just as good when they are put into action.
Camera Angles
Here i am just looking at different camera angles that professional photographers use.


A little secret that skateboarding photographers use is low camera angles, this make the obstacle that the athlete is using look bigger and enhances the look of the photograph. I shall incorporate this technique into my work when i shoot my animation.
I have also been looking at skateboard videos because that is ultimatly what mine is going to be but with animation. I have been concentrating on the way the cameraman follows the athlete, and how alot of single tricks are kept at a still low angle with the skateboarder coming towards the camera. I shall try and encorporate this into my animation. Here are just a few clips i have been looking at.
American
Sean Malto
Mike Mo Capaldi
British
Nick Jensen
European
Lucas Puig
JB Gillet
After watching a lot of skateboard videos in my time i know a little about camera angles but after watching some examples of new videos i can see that the recipe hasnt changed, its just got crisper , cleaner and sharper. I love the way professional skateboarders are filmed and photographed. I think they all follow the same subtle style and i like that. Although my animation will be quicker and not quite as fluid as a piece of actual footage, i shall try my best to recreate and capture some of the camera angles and hopefully some of the magic.


Concept
After thinking about my three words i started to link them into an idea for an animation, not only that but i also tried to link that idea with me so that i could already have the best possible knowledge on the subject due to experience.
I came up with the idea to recreate a short skateboard montage, as i have a lot of knowledge on both the physical part of it (such as doing it), and the visual part of it (capturing it through film or photography). I didn't want to just create a stereotypical skateboard animation so i did some research and thought back to times when i have been the filmer or photographer for my fellow skateboarders.
A big part of skateboard advertising is involved in magazines, and obviously you cant put video in a magazine, so what the photographers do is capture a series of snapshots and arrange them in order to recreate the effect of movement. I am going to use these snapshots and maybe some of my own to create an animation. I shall cut out just the figure of each snapshot and use them accordingly in a stop motion animation. I am hoping all goes well and the trick they were doing in the magazine should be recreated but on a new, real life, mini skate spot. I shall do this with multiple snapshot sequences and create a range of clips ready to put together to create my final Photo Montage Animation.
My Three Words
After listening to my assigned soundtrack, i came up with these 3 words :
- Fluid
- Movement
- Flowing
Friday 6 May 2011
Evaluation
Overall i am happy with my final piece. It was the first time i had done any animation so i enjoyed it quite alot. It gets tedeous at times but i think its good when a piece comes together. I think my soundtrack worked really well with the jerkyness of the film, as the pitch was always up and down and the camera was moving around, but the music was also very flowing and thats why i used the line running around the body. I tried to make it as if the music started when the hand opened and stopped when the othe hand closed, whilst in the middle the line was representing the flow and movement of the music. I had some problems with cutting it down to 30 seconds, the original one was longer with the sound track but i had to cut some frames to fit it in the 30 second barrier. Overall i am very happy with the outcome and will definatly take the skills i have used during this project and experiment in the future with more animation.
Final Animation
This is my final animation with the sound track. Overall i am very pleased with it, apart from a few issues i had with cutting it down to 30 seconds.
Here it is.
Final Animation (Without Music)
This is the animation i have done to supercede the storyboard i drew up. This shall be my final idea as it is the best animation i have done that fits best with the music.
I was really impressed with the way it came out to be honest. I like the jerkyness thats why i chose to do stop motion. I shall now go and put my soundtrack to it and fit it accordingly.
Final Animation Storyboard

This is the first section of my storyboard. It starts with a hand that turns around and opens, Then a black spot appears and a line starts to protrude out of it. By the last frame on this page the line has wrapped itself around the finger and the camera has moved to a lowwer angle to capture it.

This is the second section of my storyboard. By this point the line has travelled up the arm and onto the neck and face. In the last frame on this page the camera has taken an airel view to capture the line going in one side of the mouth and out the other.

This is the third and final section of my storyboard. Here the line has travelled out of the other side of the mouth and down towards the hand. In the final frame the line has finish in a black spot like it started an the hand is closed. The camera repeats the angle from the beggining but on the other hand.
PES
PES is an animator that uses stop motion. In this clip he utilises household objects as if they were food. I really like the fluid motion that he achieves in his work and the bright colours hes uses, especially in this clip. He has gave me insight into alot of different camera angles i can use so i shall go forth and put them into practise.
Monday 11 April 2011
Paper Ball Experiment
This is my storyboard put into action. I only wanted it to be a short experiment but I realised near enough as soon as i started that this was going to need alot more frames than i had planned in my storyboard.
I ignored it and tried it out anyway.
Dispite the 'Stop Motion Pro' watermark that cannot be removed as i am using a trial version, i think it turned out great. I was really proud as it was only my 4th piece of animation in my life. Apart from the lack of frames on my storyboard, it and the final animation are very similar and the way i captured it hard a strong resemblence to the way i planned it.
Overall it took nearly 300 frames and alot of patience but i a very happy with the way it turned out and cant wait to try my soundtrack with it.
Storyboard
After experimenting with stop motion i started to think about my sound track. I have been given:
02 Bach (JS)_ Goldberg Variations, BWV 988 - 01. Variation 1.
The previous experiments that i have done do not really work with this track. The music is very flowing and moves up and down but yet still remains very fluid, so i thought to myself what else is fluid, water? But water is also fast and would be hard to capture with stop motion. Then i started to think even more simple, and i came up with a line. A black line that draws smooth, fluid curves just like the music.
A close friend of mine did a piece of stop motion a couple of years ago of a screwed up paper ball. It was only simple but i really liked it. I liked the jerky movement as it rolled around on the floor and it obviously stuck in my mind because it was one of the first things to pop in my head when i was thinking about stop motion.
I decided that i was going to use his idea with the paper ball but expand it with my own addition.
Heres my storyboard of what it should look like.

Here is the paper ball rolling around a little then stopping and starting to open itself up. The camera will be behind it, following it.

Here it finishes opening and ends up a flat piece of paper then a black spot appears on it. towards the last two frames here the camera moves back and up onto a small tripod so it can capture the whole shot. A line starts to protrude out of the black spot.

Here the line has curved out of the spot and off the paper onto a white surface. The camera moves back, still on the tripod and the line continues towards it. The camera then continues to move to keep it all in shot as the line diverts itself away from the camera and starts swirling towards the wall. The line then goes up onto the wall and starts to write some letters while the camera moves in on it.

The line then continues to spell out 'stop motion' on the wall and the camera stays stationary. On frame 23 the camera moves right in on the letter 'n' and follows the line as it continues off the 'n' and back onto the white surface.

These are the last 3 frames. The line finishes off in a black spot like it started and the camera is moved back out to capture the whole piece. The last two frames are repeated so the image can be clearly viewed.
Now its time to try and capture this animation on camera.
Subscribe to:
Posts (Atom)